
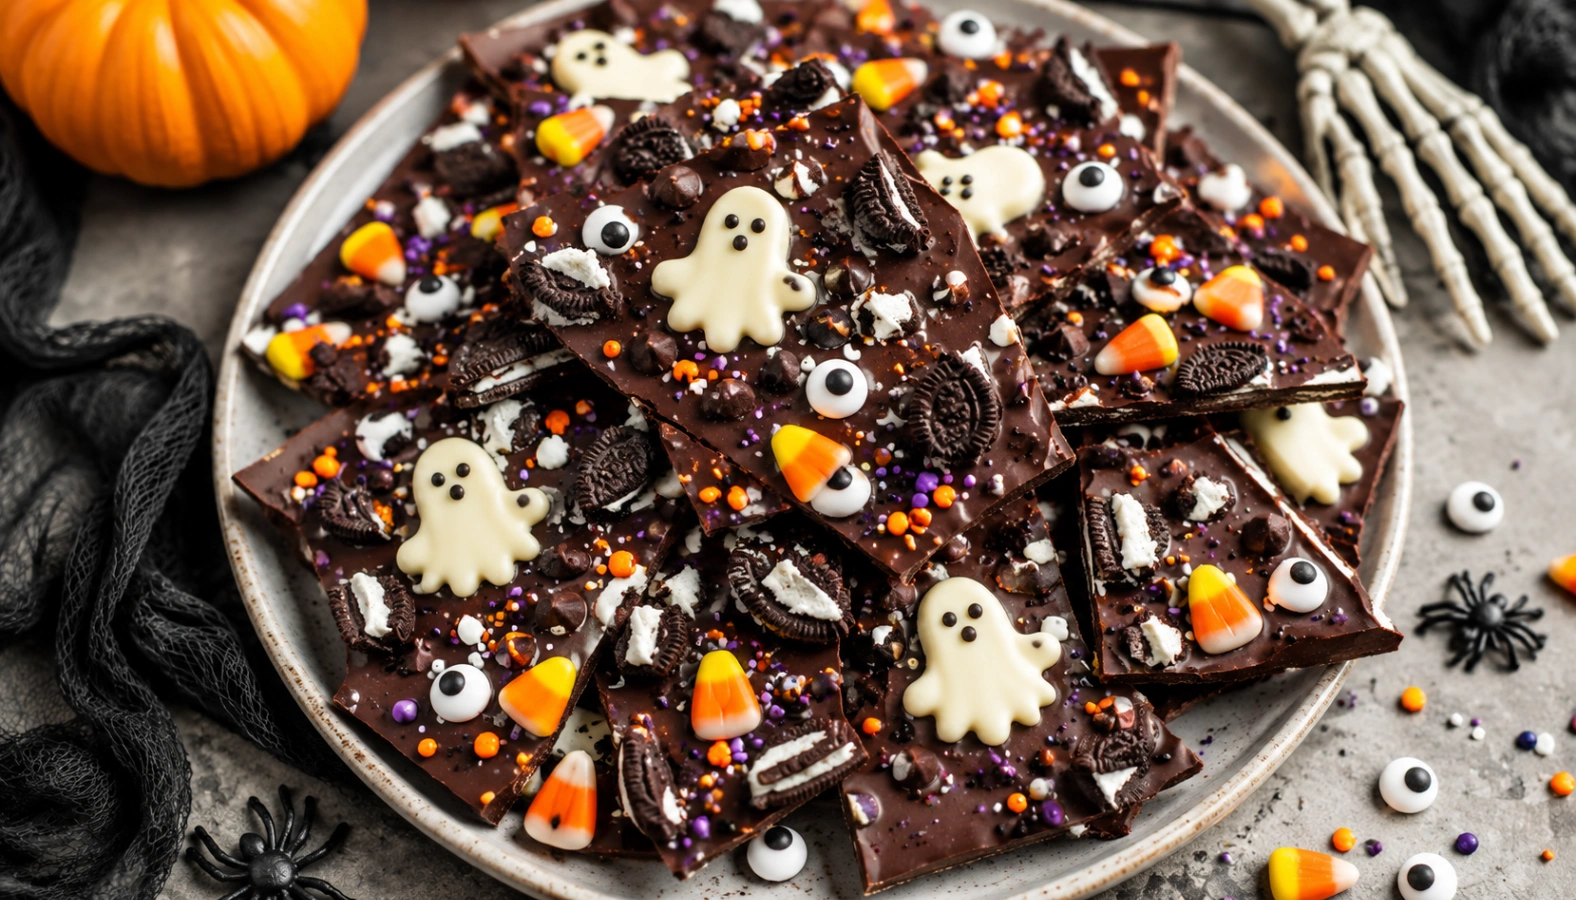
Halloween treats don’t need to be complicated or expensive. This easy Halloween Chocolate Bark is made with simple ingredients and can be customised with your favourite spooky decorations.
With melted chocolate, colourful sprinkles and fun Halloween toppings, this homemade treat is perfect for Halloween parties, school celebrations or a fun family activity in the kitchen.
The best part? It takes just minutes to prepare and is much cheaper than buying pre-made Halloween treats.
Love making homemade treats the whole family can enjoy? Explore more Halloween food ideas with easy party snacks, spooky desserts and simple recipes that make celebrating October fun without the extra cost.
Quick Snapshot
This easy Halloween Chocolate Bark is a fun homemade Halloween treat made with melted chocolate, colourful sprinkles, and spooky decorations. Ready in minutes with simple ingredients, it’s a budget-friendly recipe that’s perfect for Halloween parties, school treats, dessert tables, or a fun family activity in the kitchen. Customise it with your favourite toppings to create a festive treat everyone will love.
- Best for: Halloween parties, kids’ treats, school celebrations, dessert tables, gift bags, and homemade holiday treats.
- Prep time: 10 minutes
- Cook time: 5 minutes
- Setting time: 1 hour
- Total time: 1 hour 15 minutes
- Difficulty: Easy
- Cost: Approximately $11.60 per batch / $0.58 AUD per serve
- Cuisine: American-inspired
Serves: 20 pieces
Why You’ll Love This Halloween Chocolate Bark
Quick and Easy
Made with simple ingredients and no baking required, this festive treat comes together quickly — just melt, decorate, chill, and enjoy.
Budget-Friendly
A few affordable ingredients create a generous batch, making it a great homemade alternative to store-bought Halloween treats.
Fun for Kids
Get the whole family involved by choosing toppings, adding decorations, and creating personalised spooky designs.
Easy to Customise
Use your favourite chocolate and Halloween toppings to create a treat that’s perfect for parties, school celebrations, or sharing.
Budget Breakdown – What it Costs to Make this Recipe
One of the best things about this Halloween Chocolate Bark is that it turns a few simple ingredients into a fun homemade treat that’s perfect for parties, school celebrations, or sharing with family. Making your own Halloween treats at home can be a more affordable option than buying pre-packaged seasonal treats, while also allowing you to customise the flavours and decorations to suit your budget.
Estimated Ingredient Cost in Australia as at August 3rd, 2026 – $11.60 per batch, Approximately $0.58 per serve
Makes 20 pieces (approximately)
| Ingredient | Quantity | Estimated Cost |
| Milk Chocolate | 500g | $8.00 |
| Halloween Sprinkles | 1/2 Cup | $0.80 |
| Candy Eyes | 1/4 Cup | $1.00 |
| White Chocolate melts | 50g | $0.30 |
| Candy Corn (optional) | 80g | $1.20 |
| Oreo Cookies (Optional) | 6 cookies (approx 70g) | $0.90 |
* Disclaimer: Ingredient costs are approximate and based on average Australian supermarket prices as at the date published. Actual costs may vary depending on store, location, brand and seasonal pricing. Provided for estimation purposes only and Saavy Family Kitchen takes no responsibility for the usage of these estimates.
Halloween Chocolate Bark
Ingredients
Method
- Prepare the baking tray by lining it with baking paper or a silicone baking mat. This will make it easier to remove the chocolate once it has set.
- Melt the chocolate gently in the microwave in short intervals, stirring between each one until smooth. Be careful not to overheat the chocolate, as this can cause it to become thick or grainy.
- Pour the melted chocolate onto the prepared tray and spread it into an even layer, approximately 5mm thick.
- Add the Halloween toppings while the chocolate is still soft. Sprinkle over the broken Oreos, candy corn, candy eyes, and Halloween sprinkles, gently pressing larger pieces into the chocolate so they stay in place.
- If using coloured chocolate melts, drizzle them over the top before the bark sets for an extra festive finish. I also like to make my white chocolate into little ghostie shapes with a piping bag!
- Place the tray in the fridge for about 1 hour, or until the chocolate is completely firm.
- Once set, remove the chocolate bark from the tray and break it into pieces or cut into squares before serving.
Notes
- Nutrition values are calculated using the full recipe divided into approximately 20 pieces.
- Toppings can be adjusted based on preference, availability, and budget.
- Adding extra decorations, lollies, or chocolate drizzle will increase the calories and sugar content.
- For a lower-cost version, use supermarket-brand chocolate and limit specialty Halloween decorations.
- For allergy-friendly options, choose suitable chocolate, cookies, and decorations based on dietary needs.
Tips for Making Halloween Chocolate Bark
Use Good Quality Chocolate
The chocolate is the base of this recipe, so choose one you enjoy eating. Milk, dark, or white chocolate all work well depending on your preference.
Don’t Overheat the Chocolate
Melt the chocolate slowly and stir regularly to keep it smooth. Overheating can cause chocolate to become thick or grainy.
Add Toppings Before It Sets
Work quickly once the chocolate is spread onto the tray. Add your decorations while the chocolate is still soft so they stick properly.
Create Even Pieces
Spread the chocolate into an even layer so the bark sets consistently and is easy to break into pieces.
Make It Your Own
Swap the toppings to suit your budget or what you have available. Try different cookies, sprinkles, lollies, nuts, or dried fruit for your own Halloween twist.
Store Properly
Keep chocolate bark in an airtight container in a cool place or the fridge to prevent it from melting and help maintain freshness.
Variations to Try
Monster Chocolate Bark
Create a fun monster theme by using candy eyes, colourful sprinkles, and bright chocolate drizzles. This is a great option for kids’ Halloween parties.
Cookies and Cream Halloween Bark
Add extra crushed Oreo cookies for a crunchy cookies-and-cream version that pairs perfectly with milk or white chocolate.
White Chocolate Halloween Bark
Use white chocolate as the base and decorate with orange, black, and purple sprinkles for a bright Halloween look.
Peanut Butter Chocolate Bark
Swirl melted peanut butter through the chocolate before adding toppings for a rich sweet and salty combination.
Halloween Trail Mix Bark
Add a mixture of pretzels, nuts, dried fruit, chocolate pieces, and Halloween sprinkles for a crunchy snack-style bark.
Budget-Friendly Halloween Bark
Keep it simple with supermarket chocolate, basic sprinkles, and one or two fun toppings. It will still look festive without needing lots of specialty decorations.
Why Your Halloween Chocolate Bark Might Not Turn Out
The Chocolate Is Too Thick or Grainy
Chocolate can become thick or grainy if it overheats or comes into contact with moisture. Melt it gently and stir regularly for a smooth finish.
The Toppings Fall Off
If decorations are added after the chocolate has started setting, they may not stick. Add all toppings while the chocolate is still soft.
The Chocolate Doesn’t Set Properly
Chocolate may take longer to firm up in a warm kitchen. Place the tray in the fridge until completely set before breaking into pieces.
The Bark Is Too Thick or Too Thin
If the chocolate layer is too thick, it can be difficult to break. If it’s too thin, it may crumble easily. Aim for an even layer around 5mm thick.
The Bark Looks Messy
Chocolate bark is meant to be rustic and homemade. Don’t worry about making perfect pieces — the fun decorations are what make it special.
The Chocolate Seizes
If water gets into melted chocolate, it can seize and become hard or lumpy. Make sure bowls and utensils are completely dry before melting.
Having trouble troubleshooting other common kitchen issues? Explore our Common Cooking Problems hub for simple fixes, helpful tips, and practical advice to help you become more confident in the kitchen.
Frequently Asked Questions – Halloween Chocolate Bark
Can I make Halloween Chocolate Bark ahead of time?
Yes. Halloween Chocolate Bark is a great make-ahead treat. Prepare it several days before your event and store it in an airtight container until ready to serve.
How long does Halloween Chocolate Bark last?
Stored correctly in an airtight container, chocolate bark will keep for around 1–2 weeks. Keep it in a cool place or refrigerate if your kitchen is warm.
Can I use different types of chocolate?
Yes. You can use milk, dark, or white chocolate depending on your preference. You can also combine different chocolates to create swirls or decorative patterns.
Can I make Halloween Chocolate Bark without candy corn?
Absolutely. Candy corn can be replaced with other Halloween-themed lollies, sprinkles, mini marshmallows, crushed cookies, or chocolate pieces.
Can I freeze Halloween Chocolate Bark?
Yes. Store it in a freezer-safe container with baking paper between layers. Allow it to come back to room temperature before serving for the best texture.
How do I stop my chocolate from melting at a Halloween party?
Keep the bark chilled until serving and avoid placing it in direct sunlight or warm areas. A cool serving tray can also help keep it firm for longer.
Can kids help make Halloween Chocolate Bark?
Yes. This is a fun recipe for children to help with. They can choose toppings, decorate the chocolate, and create their own spooky designs with supervision around the melted chocolate.
Can I use white chocolate for Halloween bark?
Yes. White chocolate works especially well for Halloween because it creates a bright background for colourful sprinkles, candy eyes, and orange or black decorations.
Saavy Budget-Friendly Ideas
Use Supermarket Chocolate
You don’t need expensive chocolate to make delicious Halloween bark. Store-brand chocolate works well and helps keep the cost down, especially when making a larger batch for parties or sharing.
Choose a Few Statement Toppings
Halloween decorations can quickly add up. Instead of buying lots of specialty items, choose two or three toppings that make the bark stand out, such as candy eyes, sprinkles, or crushed cookies.
Use What You Already Have
Check your pantry before shopping. Leftover biscuits, chocolate pieces, lollies, nuts, or baking decorations can all be used to create your own Halloween bark variation.
Make It Stretch Further
Break the bark into smaller pieces so more people can enjoy it. It’s a simple way to create a larger amount of treats without increasing the cost.
Buy Decorations After Halloween
If you enjoy making seasonal treats each year, stock up on sprinkles, candy decorations, and baking supplies during post-Halloween sales for future recipes.
Make It a Family Activity
Turn decorating into part of the fun. Making homemade Halloween treats together can create special memories while costing less than buying ready-made treats.
More Recipes You’ll Love
Looking for more homemade treats and family favourites? Try these easy recipes that are perfect for sharing, celebrations, or adding a little sweetness to your week.
- Monster Cupcakes – Fun and colourful Halloween cupcakes that are perfect for parties, school celebrations, or a spooky baking activity with the kids.
- Gluten-Free ANZAC Cookies – A classic homemade cookie made with simple ingredients and perfect for lunchboxes, afternoon tea, or gifting.
- Easy Homemade Naan Bread – Soft, fluffy homemade naan that’s simple to make and pairs perfectly with family meals.
- Creamy Garlic Parmesan Pasta Sauce – A rich and comforting homemade sauce that turns everyday pasta into a family favourite.
- Homemade Tomato Pasta Sauce – A budget-friendly pantry staple made from simple ingredients and perfect for easy weeknight dinners.
Looking for more spooky inspiration? Explore our Halloween Food Ideas hub for more easy treats, party snacks and family-friendly recipes perfect for October celebrations.