
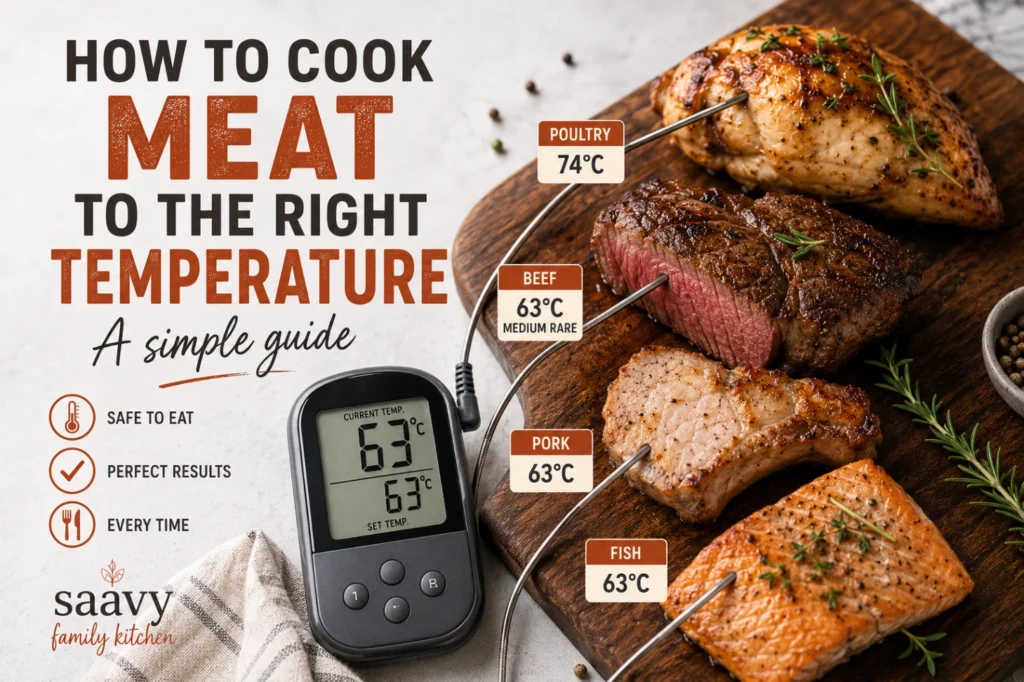
How to Cook Meat to the Right Temperature: A Simple Guide
Cooking meat to the right temperature can feel like a guessing game. Is it done yet? Should you leave it in for another five minutes? Is the outside cooked while the centre is still underdone?
The easiest way to take the guesswork out of cooking meat is to use an instant-read meat thermometer.
Internal temperature gives you a much more reliable indication of how meat has cooked than time, colour or appearance alone. It can help you cook meat to the doneness you prefer while also helping you follow appropriate food-safety recommendations.
In this guide, we’ll explain how to check meat temperature correctly, where to place your thermometer, when to check it, why meat continues cooking after it comes off the heat, and the key temperature guidelines to know for different types of meat.
We’ll also point you towards more detailed guides for steak, chicken and other meats so you can get specific advice for the cut you’re cooking.
Why Does Meat Temperature Matter?
When you’re cooking meat, it can be tempting to judge whether it’s done by how it looks on the outside or how long it has been cooking. The problem is that neither tells you exactly what is happening in the centre.
The internal temperature of meat matters for two main reasons: food safety and getting the result you want.
Temperature Helps You Know When Meat Is Cooked
Heat needs time to travel from the outside of the meat towards the centre. This means a piece of meat can look well browned on the outside while the middle is still much less cooked.
Thickness, cooking method, starting temperature and the amount of heat you’re using can all affect how quickly the centre cooks.
An instant-read thermometer lets you check what is actually happening inside instead of relying on guesswork.
Temperature Can Help Prevent Overcooking
Checking the temperature isn’t only about making sure meat is cooked enough. It can also help you avoid cooking it for longer than necessary.
This is particularly useful for steaks, chicken breasts and other lean cuts that can become dry or tough when overcooked.
By checking the temperature as the meat approaches your target, you can take it off the heat at the right time and allow for some carryover cooking while it rests.
Colour Isn’t Always a Reliable Guide
The colour of cooked meat can give you clues, but it isn’t a precise measurement of temperature.
A browned exterior doesn’t necessarily mean the centre has reached the temperature you’re aiming for, and the colour inside meat can vary for reasons other than how thoroughly it has been cooked.
That’s why a thermometer is more reliable than simply cutting into the meat and judging it by appearance.
Cooking Time Is Only a Guide
Recipes often give an approximate cooking time, but your meat may cook faster or slower than expected.
A thicker piece of meat will generally take longer than a thinner one, while different pans, ovens, grills and cooking temperatures can also change the result.
Think of cooking time as a starting point, rather than a guarantee.
Temperature Takes the Guesswork Out of Cooking
Once you get into the habit of checking internal temperature, cooking meat becomes much more predictable.
You don’t have to wonder whether another five minutes will make your meat perfect or leave it dry. You can check the temperature, make an informed decision and adjust your cooking as needed.
Saavy Tip: You don’t need an expensive thermometer to get started. A basic instant-read thermometer can be useful for everything from steak and chicken to burgers, roasts and reheating leftovers.
Looking for More Specific Meat Cooking Advice?
Different types of meat have different cooking considerations, so you don’t need to remember everything at once. Use this guide as your starting point, then dive into the specific guide for the meat you’re cooking.
Cooking Steak?
How to Tell When Steak Is Done
Learn how to check steak doneness using internal temperature, visual clues and the firmness of the meat. This guide also explains the differences between rare, medium-rare, medium, medium-well and well-done steak.
Cooking Chicken?
How to Tell If Chicken Is Cooked
A practical guide to checking whether chicken has reached a safe internal temperature, where to place your thermometer and why colour alone isn’t enough.
Cooking Pork?
How to Tell When Pork Is Done
Learn how to check pork properly without relying solely on cooking time, including where to measure the internal temperature and how resting affects the final result.
Cooking Roast Beef?
How to Tell When Roast Beef Is Done
Find out how to check the centre of a roast, understand different levels of doneness and avoid overcooking your roast.
Cooking Burgers?
How to Cook Burgers to the Right Temperature
Because minced meat is different from a whole cut of meat, burgers need their own approach to temperature and food safety.
Not sure which guide you need? Start with the meat thermometer basics in this article, then choose the specific guide above for the meat you’re cooking.
How to Use a Meat Thermometer Correctly
A meat thermometer is only useful if you place it in the right part of the meat. A few simple habits will help you get a much more accurate reading.
Insert the Thermometer Into the Thickest Part
The centre of the thickest part of the meat will usually take the longest to cook, so this is the area you want to check.
For larger pieces of meat, insert the thermometer from the side if possible. This makes it easier to reach the centre rather than accidentally measuring a thinner section closer to the surface.
Avoid Bones, Fat and the Cooking Surface
Try not to let the thermometer tip touch a bone, the pan, tray or grill. These can affect the reading and give you a temperature that doesn’t accurately represent the meat itself.
For bone-in meat, position the thermometer in the thickest part of the meat next to the bone.
Check More Than One Spot
Large roasts or unevenly shaped pieces of meat can cook at different rates. If you’re unsure, check the temperature in a couple of places and use the lowest reading as your guide.
This is particularly useful when cooking a large roast or several pieces of meat together.
Don’t Wait Until the Meat Looks Done
Start checking the temperature towards the end of cooking rather than waiting until the meat looks completely cooked.
This gives you time to make adjustments without accidentally cooking the meat well beyond your target.
Clean Your Thermometer Between Uses
If your thermometer touches raw meat, clean and sanitise the probe before using it again, particularly if you’re checking cooked food or moving between different foods.
A clean thermometer helps prevent cross-contamination and keeps your cooking process safer.
Saavy Tip: Keep your thermometer somewhere easy to reach rather than tucked away in a drawer. Once checking temperature becomes part of your normal cooking routine, you’ll find yourself relying much less on guesswork.
When Should You Check the Temperature?
Knowing where to place your thermometer is important, but when you check the temperature matters too.
You don’t need to constantly check meat while it cooks. In fact, opening the oven or repeatedly lifting the lid on a barbecue can make cooking less consistent. Instead, start checking when the meat is getting close to the point where you expect it to be done.
Check Toward the End of Cooking
Use the cooking time in your recipe as a rough guide, then start checking the internal temperature as you get closer to the expected finish.
This is particularly helpful when you’re cooking a thick piece of meat, as the outside can look ready before the centre has reached the temperature you want.
Check Before You Think It’s Fully Done
Don’t wait until the meat looks completely cooked before inserting the thermometer. By then, it may already have gone past your preferred temperature.
Checking slightly earlier gives you time to remove the meat from the heat and allow it to finish cooking as it rests.
For Large Roasts, Check More Than Once
Large roasts can have areas that cook at different rates. Check the thickest part and, if necessary, check another nearby section to make sure the temperature is consistent.
Remember That Meat Continues Cooking
Meat doesn’t immediately stop cooking when you remove it from the oven, pan or grill. The internal temperature can continue to rise for a while as the residual heat moves through the meat.
This is known as carryover cooking.
How much the temperature rises depends on factors such as the size and thickness of the meat, the cooking method and how hot it was when removed from the heat.
Saavy Tip: If you’re cooking a large roast, don’t rely on the clock alone. Use the cooking time as a guide and let the internal temperature tell you when it’s ready.
Meat Temperature Guide
Different types of meat have different temperature requirements, so there isn’t one temperature that works for everything. The right target depends on the type of meat, the cut and whether you’re cooking a whole cut or minced meat.
Use the guide below as a quick reference, then check the more detailed guides for specific meats and cooking methods.
| Type of Meat | What to Check |
|---|---|
| Beef steak | Desired level of doneness and applicable food-safety guidance |
| Beef roasts | Temperature in the thickest part of the roast |
| Chicken & turkey | Internal temperature in the thickest part |
| Pork | Internal temperature in the thickest part |
| Minced beef / burgers | Internal temperature throughout the centre |
| Lamb | Internal temperature according to your preferred doneness and food-safety guidance |
Why There Isn’t One Universal Temperature
A whole steak and a minced beef burger shouldn’t be treated exactly the same way. With a whole cut, the inside has had less opportunity for surface contamination to be distributed throughout the meat. Minced meat, on the other hand, has been processed throughout, which changes the food-safety considerations.
The same applies to poultry, where thorough cooking is particularly important.
That’s why it’s better to follow meat-specific temperature guidance rather than assuming every type of meat should reach the same temperature.
Want the Specific Temperature?
For a detailed breakdown, use our individual guides:
- How to Tell When Steak Is Done – rare, medium-rare, medium, medium-well and well-done steak.
- How to Tell If Chicken Is Cooked – how to check chicken safely and accurately.
- Coming Soon: How to Tell When Pork Is Done – practical temperature and doneness guidance for pork.
- Coming Soon: How to Tell When Roast Beef Is Done – checking the centre of a roast and understanding doneness.
- Coming Soon: How to Cook Burgers to the Right Temperature – why minced meat needs a different approach.
Saavy Tip: When you’re unsure, don’t rely on colour or cooking time alone. Check the internal temperature with a reliable thermometer and follow the appropriate food-safety guidance for the type of meat you’re cooking.
Carryover Cooking: Why Meat Keeps Cooking After You Remove It
Have you ever taken meat out of the oven or pan at what seemed like the right temperature, only to find that it was more cooked when you sliced it?
This is called carryover cooking.
The outside of the meat is exposed directly to heat, while the centre is cooler. Even after you remove the meat from the heat source, that residual heat continues moving towards the centre. As a result, the internal temperature can rise slightly while the meat rests.
Why Does Carryover Cooking Matter?
Carryover cooking is worth remembering when you’re aiming for a specific level of doneness. If you wait until meat reaches its final target temperature before removing it from the heat, it may continue cooking beyond where you intended.
The amount of temperature increase isn’t always the same. It can depend on:
- The size and thickness of the meat
- How hot the meat was when removed from the heat
- The cooking method
- How long the meat rests
Large roasts tend to retain more heat than smaller pieces of meat.
Should You Always Remove Meat Early?
Not necessarily. How early you remove meat depends on what you’re cooking and the final temperature you’re aiming for.
The important thing is to allow for carryover cooking rather than assuming the temperature stops rising immediately.
For smaller cuts, the difference may be relatively small. For larger roasts, it can be more noticeable.
Saavy Tip: If you’re cooking meat to a specific temperature, check it before you think it’s completely finished and allow for some additional cooking while it rests.
Food Safety When Cooking Meat
Cooking meat to the right temperature is an important part of food safety, but it’s not the only thing to consider. Safe handling, storage and avoiding cross-contamination all matter too.
Keep Raw and Cooked Meat Separate
Use separate plates and utensils for raw and cooked meat where possible. Don’t place cooked meat back onto a plate that held raw meat unless it has been thoroughly washed first.
Wash Your Hands and Surfaces
Wash your hands with soap and water after handling raw meat, and clean chopping boards, knives, benches and other surfaces that have come into contact with it.
Use a Clean Thermometer
If your thermometer has been used to check raw meat, clean the probe thoroughly before using it on cooked food or another ingredient.
Don’t Rely on Colour Alone
Meat can change colour during cooking, but colour isn’t a precise indication of internal temperature. Meat may look cooked before it has reached the temperature you need, while some cooked meat can retain pink colouring.
A thermometer provides a much more useful measurement.
Follow Meat-Specific Food-Safety Guidance
Different meats have different food-safety considerations, so always follow current guidance for the particular type of meat you’re cooking.
This is particularly important for poultry and minced meat, where thorough cooking is generally more important than simply judging appearance or preferred doneness.
For people more vulnerable to foodborne illness, including young children, older adults, pregnant people and those with weakened immune systems, taking extra care with meat preparation and cooking is particularly important.
Saavy Tip: When you’re unsure whether meat has been cooked sufficiently, don’t guess. Check the internal temperature and follow the appropriate food-safety guidance for that type of meat.
Common Mistakes When Checking Meat Temperature
Using a thermometer makes cooking meat much easier, but there are a few common mistakes that can lead to inaccurate readings or overcooked meat.
Checking Too Close to the Surface
The outside of meat cooks faster than the centre, so measuring too close to the surface can give you a temperature that is higher than the temperature in the middle.
Always aim for the thickest part.
Touching Bone or the Cooking Surface
If the thermometer tip touches a bone, pan, tray or grill, the reading may not accurately reflect the temperature of the meat.
Position the probe in the meat itself.
Checking Only One Spot
Large or uneven pieces of meat can cook at different rates. If you’re cooking a roast, checking more than one area can help you find the coolest part.
Waiting Until the Meat Looks Done
By the time meat looks completely cooked, it may already have gone beyond your preferred temperature.
Start checking towards the end of cooking so you have time to make adjustments.
Relying on Cooking Time Alone
Cooking times are useful estimates, but they can’t account for every variable in your kitchen.
Two pieces of meat that look similar can have different thicknesses, starting temperatures or cooking conditions.
Use the recipe’s cooking time as a guide, then let the internal temperature tell you when the meat is ready.
Forgetting Carryover Cooking
Remember that the temperature can continue to rise after meat is removed from the heat.
If you’re aiming for a particular final temperature, take this into account rather than waiting until the meat reaches the exact final temperature while it is still cooking.
Saavy Tip: If a temperature reading seems unexpectedly high or low, check the thermometer placement before changing your cooking method. Moving the probe just a few centimetres can make a significant difference, particularly in thicker cuts.
How to Tell If Meat Is Done Without a Thermometer
Don’t have a meat thermometer? You can still use a combination of cooking time, appearance and texture to judge whether meat is cooked, but these methods are less reliable than checking the internal temperature.
Check the Appearance
The outside of meat should generally be well browned or cooked according to the recipe, but this doesn’t tell you exactly what is happening in the centre.
For some meats, such as chicken, cutting into the thickest part can give you a visual clue. However, appearance alone shouldn’t be treated as a precise food-safety test.
Check the Texture
As meat cooks, it generally becomes firmer. Experienced cooks can use this as a rough indication of doneness, particularly with steaks.
However, firmness varies between cuts, so this method takes practice and isn’t a substitute for a thermometer when accurate temperature matters.
Use Cooking Time as a Guide
Recipe cooking times can help you estimate when meat might be ready, particularly if you’re cooking the same recipe regularly.
Just remember that cooking time can change depending on the thickness of the meat, starting temperature, cooking equipment and heat level.
When You Really Should Use a Thermometer
For foods where accurate internal temperature is particularly important for food safety, it’s much better to use a thermometer than rely on appearance or texture.
A basic instant-read thermometer is inexpensive, takes only a few seconds to use and can be useful for many different foods.
Saavy Tip: If you’re regularly unsure whether meat is cooked, a thermometer is one of the simplest kitchen tools you can add to your cooking routine. It removes much of the guesswork and can help you become a more confident cook.
Frequently Asked Questions
What is the safest way to tell if meat is cooked?
The most reliable way is to check the internal temperature with a properly used meat thermometer and follow the appropriate food-safety guidance for the type of meat you’re cooking.
Can I tell if meat is cooked by its colour?
Colour can provide a clue, but it isn’t a reliable way to measure internal temperature. Meat can look cooked on the outside while the centre is still cooler, and some cooked meat can retain pink colouring.
Where should I put a meat thermometer?
Insert the thermometer into the thickest part of the meat, aiming for the centre. Avoid touching bones, the cooking pan or other surfaces that could affect the reading.
Should I check meat while it’s cooking or after?
Check it towards the end of cooking, before you expect it to be completely finished. This gives you time to remove it from the heat before it becomes more cooked than intended.
Why does meat temperature rise after cooking?
Residual heat continues moving from the hotter outer areas towards the cooler centre after meat is removed from the heat. This is known as carryover cooking.
Do cooking times guarantee that meat is done?
No. Cooking times are estimates and can vary depending on the thickness of the meat, starting temperature, cooking method and heat level. Internal temperature is a more reliable guide.
Do different types of meat need different temperatures?
Yes. Beef, poultry, pork, lamb and minced meat have different cooking and food-safety considerations. Always use guidance specific to the type of meat you’re preparing.
Is a meat thermometer worth buying?
For most home cooks, yes. A basic instant-read thermometer can be used for steak, chicken, burgers, roasts and many other foods. It is a simple way to reduce guesswork and avoid both undercooking and overcooking.
Why is my meat cooked outside but raw in the middle?
The outside is exposed directly to the heat source, so it can cook and brown much faster than the centre. This is especially common with thick cuts. Lowering the heat and allowing more time for the centre to cook can help.
Should meat rest after cooking?
Many types of meat benefit from resting after cooking. Resting allows the temperature to settle and gives the juices time to redistribute, while also allowing for some carryover cooking.
Saavy Budget-Friendly Ideas
Cooking meat to the right temperature isn’t just about getting better results—it can also help you save money by reducing food waste and making the most of the meat you buy.
Make Your Meat Go Further
You don’t need to serve a large piece of meat to make a satisfying family meal. Slice cooked meat and serve it alongside filling, affordable sides such as potatoes, rice, pasta, seasonal vegetables or salad.
Buy What’s on Special
Look for meat specials and markdowns when planning your meals. If you find a good deal, portion suitable cuts before freezing them so you only thaw what you need.
Don’t Overcook Expensive Cuts
Overcooking can turn an otherwise tender piece of meat dry or tough. A basic meat thermometer can help you avoid cooking meat for longer than necessary.
This is particularly useful when you’ve spent more on a premium cut.
Make Use of Leftovers
Leftover cooked meat can become the starting point for another meal. Slice it into sandwiches or wraps, add it to salads, use it in fried rice or pasta, or turn it into a filling for tacos or quesadillas.
Invest in One Useful Tool
You don’t need a kitchen full of gadgets to cook meat well. An instant-read meat thermometer is one of the most useful inexpensive tools because you can use it for steak, chicken, burgers, roasts and many other foods.
Saavy Tip: A thermometer can pay for itself surprisingly quickly if it helps you avoid even a few overcooked meals. Getting the temperature right the first time means less wasted food and better value from the meat you buy.
The Bottom Line: Cook Meat With Confidence
Cooking meat to the right temperature doesn’t have to involve guesswork. Once you understand how to use a thermometer and know where and when to check the temperature, it becomes much easier to get consistent results.
Remember these simple principles:
- Use internal temperature as your main guide, rather than relying only on cooking time or colour.
- Check the thickest part of the meat and avoid bones or the cooking surface.
- Start checking towards the end of cooking so you don’t accidentally overcook your meat.
- Allow for carryover cooking after removing meat from the heat.
- Follow meat-specific food-safety guidance, particularly when cooking poultry or minced meat.
- Rest meat before serving when appropriate.
You don’t need to become an expert overnight. A reliable thermometer and a little practice can make a noticeable difference to your confidence in the kitchen.
And when you need more specific help, head to the individual guides for How to Tell When Steak Is Done and our upcoming guides for chicken, pork, roast beef and burgers.
Saavy Tip: The goal isn’t to memorise every temperature. It’s to understand the simple process: cook, check, adjust, rest and enjoy.
More Kitchen Guides
Ready to build your cooking confidence? Explore more practical Saavy Family Kitchen guides designed to make everyday cooking easier:
- How to Tell When Steak Is Done – Learn how to check steak doneness using temperature, firmness and visual clues.
- How to Cook Rice Without Guessing – Simple tips for getting fluffy, properly cooked rice.
- How to Cook Pasta Perfectly Every Time – Practical techniques for cooking pasta without it becoming mushy or undercooked.
- How to Cook Eggs – Learn the basics of boiling, frying and scrambling eggs.
- Recipe Troubleshooting – Find simple solutions to common cooking problems when something doesn’t turn out as expected.